Part 3: Define GraphQL Schema
Introduction
In the last part you learned how to create GraphQL nodes and use them in your site. In this part you’ll dive deeper into the GraphQL schema creation process and learn how to modify the schema. This knowledge will be valuable for the reliability and usability of your plugin.
One of Gatsby’s main strengths is the ability to query data from a variety of sources in a uniform way with GraphQL. For this to work, a GraphQL schema must be generated that defines the shape of the data. Gatsby is able to automatically infer a GraphQL Schema from your data, and in many cases, this is really all you need. However, there are situations when you either want to explicitly define the data shape, or add custom functionality to the query layer — this is what Gatsby’s createSchemaCustomization Node API provides.
In this part of the tutorial, you’ll learn how to use the createSchemaCustomization Node API.
By the end of this part of the tutorial, you will be able to:
- Describe how Gatsby automatically creates GraphQL types
- Explicitly define the GraphQL schema for your plugin
- Create a foreign-key relationship between your
PostandAuthornodes
Automatic type inference
Before explaining how you can explicitly define your GraphQL schema, it’s important for you to understand how Gatsby’s automatic type inference works. Then, it’ll make more sense why you’d want to define a schema manually and what benefits this offers.
In order to translate the data shape into GraphQL type definitions, Gatsby has to inspect the contents of every field and check its type. There is a big problem with this approach though: If the values on a field are of different types, Gatsby cannot decide which one is the correct one. A consequence of this is that if your data sources change, type inference could suddenly fail. For example, this could happen when data from your source is optional and thus can sometimes exist, sometimes not exist.
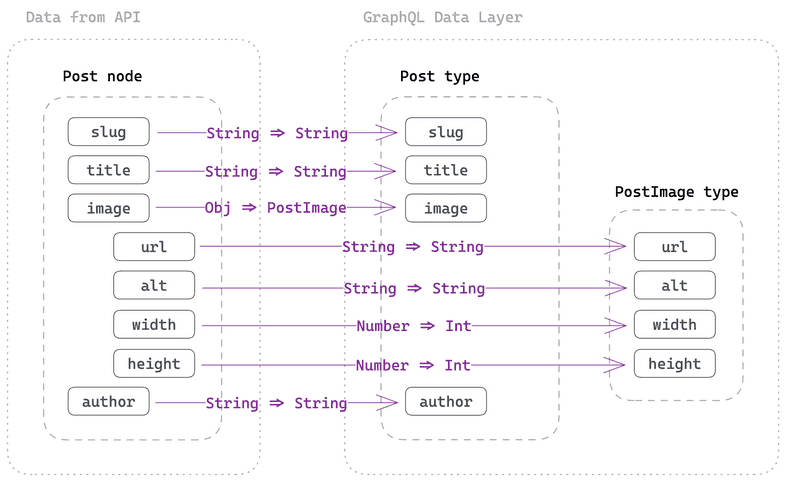
The diagram below shows how inference works:
Expand for detailed description
You source your incoming data, for example the Post information:
When you pass this data through createNode (as shown in Part 2) Gatsby inspects the data and tries to figure out (“infer”) the appropriate GraphQL types. So a JavaScript String becomes a GraphQL String, a JavaScript Number becomes an Int, and a JavaScript object becomes a new GraphQL type.
The Post will be translated to this:
Now let’s imagine that not every key on the Post input data is always given. There could be an additional, new field called subTitle on the Post input. Not every post will have a subtitle, therefore it’s an optional field.
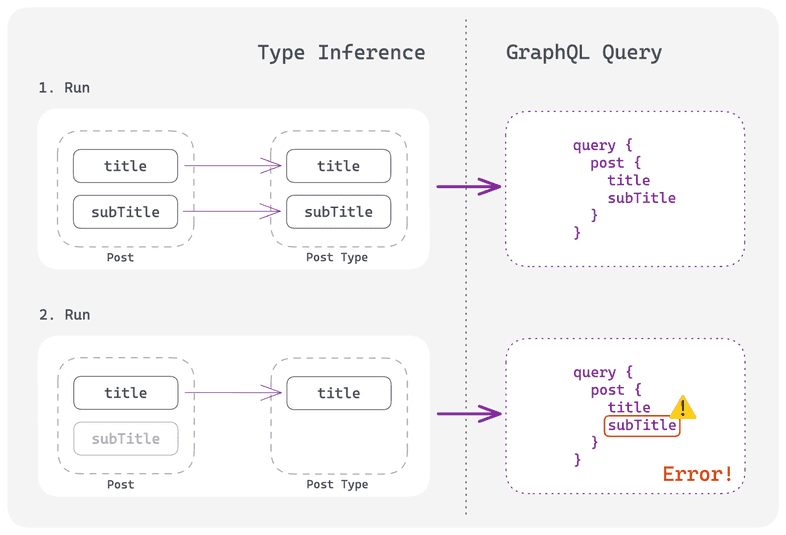
The diagram below shows the problem with inference when data has optional fields:
Expand for detailed description
On the first run the incoming data has title and subTitle so Gatsby also infers both fields for its Post GraphQL type. You can then query it in your page/static queries and expect it to exist in the schema.
But on the second run the subTitle was removed from the data and as a consequence Gatsby didn’t infer this field. subTitle now doesn’t exist in the Post GraphQL type, but in the GraphQL query you’re still trying to query it. This leads to an error where Gatsby complains that it can’t find the field.
The error would be something like this (in your terminal):
So while you know that subTitle is optional, Gatsby can’t automatically infer this. Therefore you’ll need to help Gatsby interpret your data and define the GraphQL schema — which you’ll learn in the next step.
Explicitly define your GraphQL schema
We strongly recommend to explicitly define the GraphQL schema for your source plugin to ensure future compatibility with Gatsby’s ecosystem. This way the pitfalls you’ve read above won’t occur. In general, it’s considered best practice to define types as it adds reliablity and usability to your plugin.
Without further ado, add a new file called create-schema-customization.ts to the plugin with the following contents:
Add the new createSchemaCustomization export to the gatsby-node.ts file so that it gets executed:
Also double check that you’re running the develop:deps script in your terminal so that your changes to the plugin are compiled.
createTypes
Before using createTypes, here are some things to note for its usage:
- Type definitions can be provided either in GraphQL’s schema definition language (SDL), Gatsby Type Builders, or a combination of both. You’ll use the SDL syntax for the rest of this tutorial but you can also read an example for Gatsby’s Type Builder syntax in this part.
- By default, explicit type definitions you add with
createTypeswill be merged with inferred field types. So if you only want to define a subset of fields, the rest will be inferred as before. You can modify this behavior with the@inferand@dontInferextensions. You’ll learn more about extensions in Add a foreign-key relationship. - Type definitions targeting root node types, e.g.
MarkdownRemarkor others added insourceNodes/onCreateNodelikePostandAuthor, need to implement theNodeinterface. You can do this by addingimplements Nodeto the SDL.
Using an arbitrary example, let’s imagine this is the shape of incoming data to createNode that gets inspected and inferred:
In this example, let’s pretend that you know state is not always provided — meaning that you want to explicitly define it to avoid the situation described above. Conversely, you also know that street will always be defined, and as such, you can mark it as Non-Null with a !. Lastly, city will be automatically inferred and merged with the custom types.
In this example the User type is a root node type, so you’ll be able to query it with allUser and user in GraphQL.
Gatsby Type Builder example
In many cases, GraphQL SDL provides a succinct way to provide type definitions for your schema. If however you need more flexibility, createTypes also accepts type definitions provided with the help of Gatsby Type Builders, which are more flexible than SDL syntax. They are accessible on the schema argument passed to Node APIs.
The SDL syntax is easier to read and should be used with GraphQL schemas that are predefined (“hardcoded”). The SDL syntax becomes harder to read once it’s generated through string interpolation due to a dynamic GraphQL schema.
This is where the Type Builders come in. They are better suited for a GraphQL schema that should be dynamically generated, e.g. when your CMS has the ability to create custom types.
Task: Add types for Post and Author
Going back to your create-schema-customization.ts file, begin writing out the GraphQL types inside createTypes. Start by creating the root node types:
One note on the usage of id: ID!: Each GraphQL type that implements the Node interface needs to define the field id with type ID!.
Since you’ve defined the names for your node types in the NODE_TYPES constant, use them through string interpolation:
Try to add the fields for both root node types. Can you figure it out by inspecting the data shape used in source-nodes.ts? Don’t worry if not, you can use the solution below.
Show me the solution
Your solution could look something like this:
Pro tip: If you use the GraphQL Typegen option, during gatsby develop the file .cache/typegen/schema.graphql will be generated. This is the current GraphQL schema inside Gatsby and you can use it to copy/paste types.
You can also use the documentation explorer in GraphiQL to figure out the exact shape of GraphQL types.
When restarting the develop:site script you won’t see any difference in your frontend at http://localhost:8000 since only the GraphQL types behind the scenes slightly changed.
If you go to site/src/pages/index.tsx in your editor, you can hover over e.g. <h2>{post.title}</h2> and verify that the TypeScript type is now string. Previously, the type would have been string | null as the GraphQL type was also nullable. Thus defining GraphQL types explicitly and marking fields as non-null has the nice benefit of making GraphQL Typegen more accurate, too.
Add a foreign-key relationship
As mentioned in the introduction, you can use the createSchemaCustomization Node API not only for defining the data shape, but also to add additional functionality. Out of the box, Gatsby provides ready to use extensions you can use without having to manually write GraphQL field resolvers. The easiest way of using them is through a directive in the SDL.
If you want to learn more, read our documentation about extensions and directives and how you can create your own custom extensions.
Pro tip: The createSchemaCustomization API is really powerful and also allows you to create custom resolvers. However, in the context of a source plugin the usage of custom resolvers should be discouraged! Please use a combination of @link/@proxy instead of custom resolvers due to performance reasons.
In this tutorial you’ll use the @link extension to create a foreign-key relationship between your Post and Author nodes. This relationship can either already exist in your data source (and you want to replicate it) or it can be a completely new association you want to create.
You can also use the @proxy directive to model your GraphQL types to your liking but it won’t be covered in this tutorial.
Foreign-key relationship: This term comes from relational databases. A foreign-key is a set of attributes in a table that refers to the primary key of another table. The foreign-key links these two tables.
When inspecting the incoming Post and Author data, do you see the foreign-key between both data sets?
Post:
Author:
The author field on Post is the foreign-key to the Author data set. It is the unique identifier that could link both data sets together.
Key Gatsby Concept 💡
The goal of a foreign-key relationship through @link in Gatsby is to expand the provided field value to a full node. You can enrich the information of a node by adding relevant/additional data from another node.
This is a really powerful ability in Gatsby’s data layer.
Imagine this example: “Team Gatsby” likes to author their blog posts in Markdown, “Team Daisy” is responsible for keeping author information up do date and keeps track of that in a CMS. As long as both teams use the same unique identifier, both nodes can be linked together in Gatsby’s data layer. Both teams can work independently on their data.
In the previous section you already defined the GraphQL types for Post and Author so all the necessary boilerplate is already done. You can now use the @link extension (as a directive in the SDL). Before showing that, here’s a short explanation on the @link extension:
@linkcan receive two arguments (byandfrom) but if no argument is given, Gatsby will use theidfield as the foreign-key field (equivalent to@link(by: "id")). You’ll use this default behavior in Part 6 for the Image CDN feature.byis the field you link to (on the target node)fromis the field you link from (on the current node). Check the foreign-key documentation for more details.- You’ll also need to adjust the GraphQL type of the field on the current node since you’re extending the field from a
String/Intto a full node
As you want to link the author field of Post to the name field of Author, you’ll need to write the @link extension like so:
The GraphQL type of author needs to be changed from String! to Author as this field now should hold a full Author node.
Open the create-schema-customization.ts file and make the necessary changes:
Restart the develop:site script. The terminal should print out an error like this:
This is actually a good sign! It means that the current GraphQL queries in src/pages/index.tsx and src/pages/{Post.slug}.tsx are outdated with their usage of author.
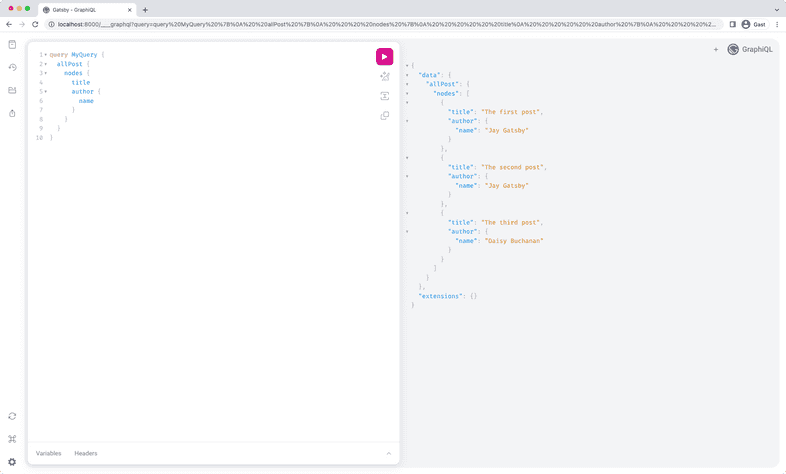
Open GraphiQL at http://localhost:8000/___graphql and run the following query:
You should get the following result back:
Awesome, you successfully linked the Post and Author nodes! To wrap up this part of the tutorial, update the index page and page template in your example site.
Update the query and usage in src/pages/index.tsx like so:
And in src/pages/{Post.slug}.tsx like so:
Visit your index page in the browser and everything should be working again.
Summary
Good job! You’ve extended your knowledge about Gatsby’s data layer.
Take a moment to think back on what you’ve learned so far. Challenge yourself to answer the following questions from memory:
- How does Gatsby’s automatic type inference work?
- What are pitfalls of this automatic inference?
- What Node API and functions should you use to prevent those pitfalls?
- What is a foreign-key relationship and how to you set one up in Gatsby?
Key takeaways
- One of Gatsby’s main strengths is the ability to query data from a variety of sources in a uniform way with GraphQL. For this to work, a GraphQL schema must be generated that defines the shape of the data.
- By default, Gatsby’s GraphQL schema is automatically inferred from your data. Gatsby inspects the contents of every field and checks its type in order to convert it to GraphQL types. However, while powerful, this automatic type inference has problems with field values of different types.
- To make your plugin more reliable, you should explicitly define the GraphQL schema for it. This way the pitfalls from the automatic type inference won’t occur.
- You can use the
createTypesfunction to define a GraphQL schema (in SDL syntax or via Gatsby Type Builders) - Gatsby has existing GraphQL extensions like
@linkthat enable you to add functionality to your schema - You can use
@linkto create a foreign-key relationship between GraphQL nodes
Share Your Feedback!
Our goal is for this tutorial to be helpful and easy to follow. We’d love to hear your feedback about what you liked or didn’t like about this part of the tutorial.
Use the “Was this doc helpful to you?” form at the bottom of this page to let us know what worked well and what we can improve.
What’s coming next?
In Part 4 of the Tutorial, you’ll learn all about utilities available to plugin authors to improve the functionality of your plugin.
Continue to Part 4

