Part 1: Create and Deploy Your First Gatsby Site
Introduction
Now that you’ve set up your computer with all the tools you’ll need, it’s time to get started!
Over the course of this Tutorial, you’ll build and deploy your first Gatsby site: a blog site with support for images and MDX! (If that doesn’t mean anything to you now, that’s okay! It will by the time you reach the end.) Here’s a finished example of the site you’ll build. You can also follow along with the GitHub repository for the finished example.
In this part of the Tutorial, you will go through the process of creating the template for your blog site and deploying it online for everyone to see.
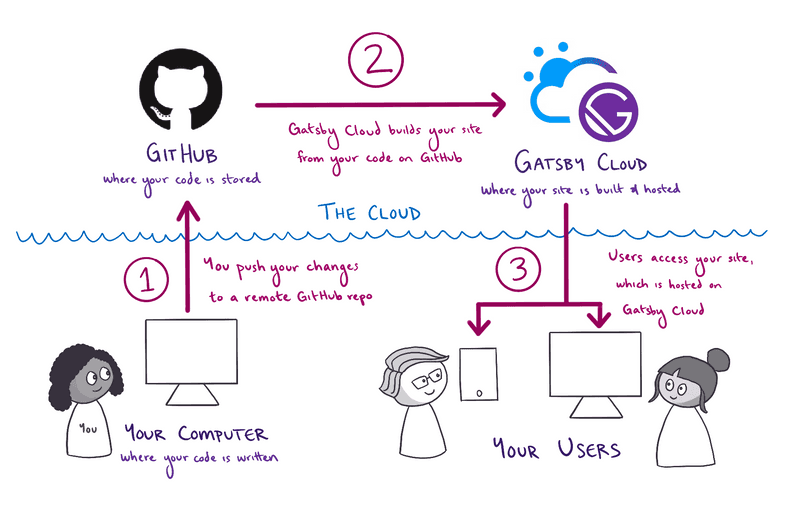
The diagram below shows a high-level view of how all the pieces of this process fit together. (Don’t worry if this doesn’t make sense yet. You’ll learn about each step as you go.)
Expand for detailed description
First, you write the code for your Gatsby site from your computer. When you’re ready to make your changes live on the internet, you go through the following steps:
- You push your changes from your computer to a remote repository on GitHub. GitHub is an online platform for storing code for your projects.
- Netlify watches your GitHub repository for changes. When it sees your new changes, Netlify builds your site from your code on GitHub.
- Netlify hosts the finished version of your site at a unique URL, which users can use to access the latest version of your site.
Prefer a video?
If you’d rather follow along with a video, here’s a recording of a livestream that covers all the material for Part 1.
Note: Parts of this recording may be slightly outdated, but the concepts are generally applicable. For the most up-to-date information, follow along with the written tutorial.
Don’t want to miss any future livestreams? Follow our Gatsby Twitch channel.
Create a Gatsby site
To create your first Gatsby site, you’re going to use a command from the Gatsby command line interface (CLI): gatsby new. This command brings up an interactive prompt that asks you questions about the site you want to build. After you enter all the information, the CLI uses your answers to automatically generate your new Gatsby site.
Note: For this Tutorial, your Gatsby CLI should be v4.8 or newer. To check what version you have installed, run the following command:
Need to update? Run the command below to get the latest version of the Gatsby CLI:
Let’s take a closer look at the process:
- Open the command line, and use the
cdcommand to change directories into the folder where you want to create your new Gatsby site. For example, if you wanted to create your new site on your desktop, you might type:
- Run the following command from the command line. This will start up the interactive prompt to help you create a new Gatsby site.
Having trouble with gatsby new? If you had trouble globally installing gatsby-cli in Part 0, you can also create a new site by running npm init gatsby from the command line instead of gatsby new.
- When the prompt asks, “What would you like to call your site?” enter a name for your site.
- When the prompt asks, “What would you like to name the folder where your site will be created?” use the default folder name, which will be based on the site name you chose.
- When the prompt asks, “Will you be using JavaScript or TypeScript?” choose JavaScript.
This tutorial doesn’t require any prior TypeScript knowledge as it uses JavaScript. If you’re familiar with TypeScript you can read the Gatsby and TypeScript guide to learn about typings, files, and conventions. If you want to use TypeScript we recommend going through the tutorial first and then only afterwards convert the project to TypeScript.
- When the prompt asks, “Will you be using a CMS?” select “No (or I’ll add it later)”.
In the future, you can use these options to tell gatsby new what features you want to add to your site, and gatsby new will automatically configure them for you. It’s a much quicker way to set up new projects.
But in this first site, you’ll set things up manually to learn about how Gatsby’s pieces fit together.
- When the prompt asks, “Would you like to install a styling system?” select “No (or I’ll add it later)”. (You’ll add styles manually later.)
- When the prompt asks, “Would you like to install additional features with other plugins?” use the arrow and Enter keys to select “Done”.
- The prompt will show you a summary of what
gatsby newwill do. It should look something like the output below.
- When the prompt asks, “Shall we do this?” enter “Y”. The
gatsby newcommand will start building your site. Your internet download speed will affect how long this command takes to run. After it finishes, you should see a message like this:
Congratulations, you’re now the owner of a brand-new Gatsby site!
Run your site locally
So far, you’ve generated the code for your site, but what does it actually look like in a web browser like Firefox or Google Chrome? To find out, you’ll first need to start up your site’s local development server.
The development server is a useful tool for when you’re working on your site locally (from your own computer). When your development server is running, you can use a web browser to interact with your local copy of your site. That way, you can test out changes to your code, to make sure they work before you actually publish a new version of your site to the internet.
To start up your development server, do the following:
- In the command line, change into the directory you created for your site:
Tip: Whenever you want to run any commands for your site, you need to be in the context for that site. That is, your command line needs to be pointed at the directory where your site’s code lives.
- From your site directory, start the development server by running the following command:
If you weren’t able to install the Gatsby command line interface globally, you can start your development server using the following command instead:
- After a few moments, the command line should output a message like the following, telling you your development server is ready to go!
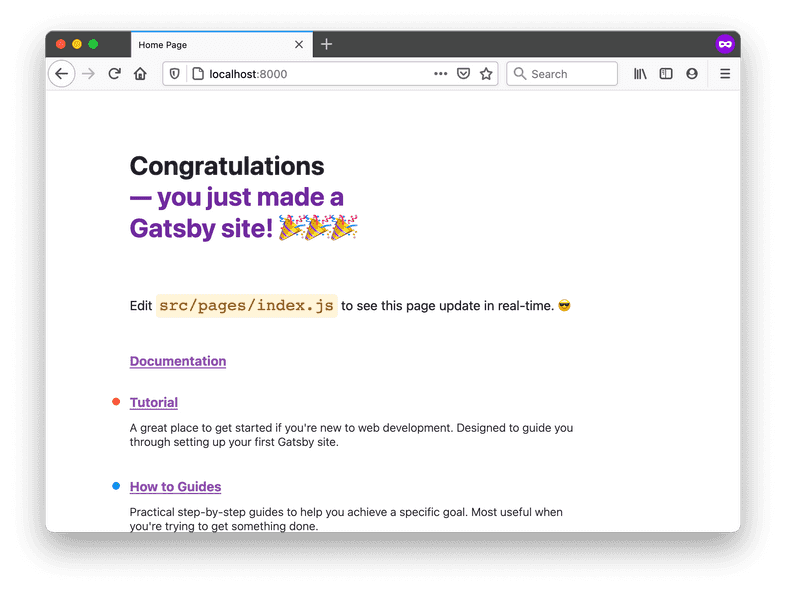
- Open your favorite web browser and navigate to
http://localhost:8000.
And there it is: your very first Gatsby site! 🎉
You’ll be able to visit the site locally at http://localhost:8000/ for as long as your development server is running. (That’s the process you started by running the gatsby develop command.) To stop running that process (or to “stop running the development server”), go back to your terminal window, hold down the “control” key, and then hit “c” (ctrl-c). To start it again, run gatsby develop again!
Note: If you are using VM setup like vagrant and/or would like to listen on your local IP address, run gatsby develop --host=0.0.0.0. Now, the development server listens on both http://localhost and your local IP.
Set up a GitHub repo for your site
GitHub is a website that many developers use to back up and share their code online. By uploading your code to GitHub, you’ll be able to work on the same codebase from multiple computers. You’ll also be able to use Netlify to build and host your site.
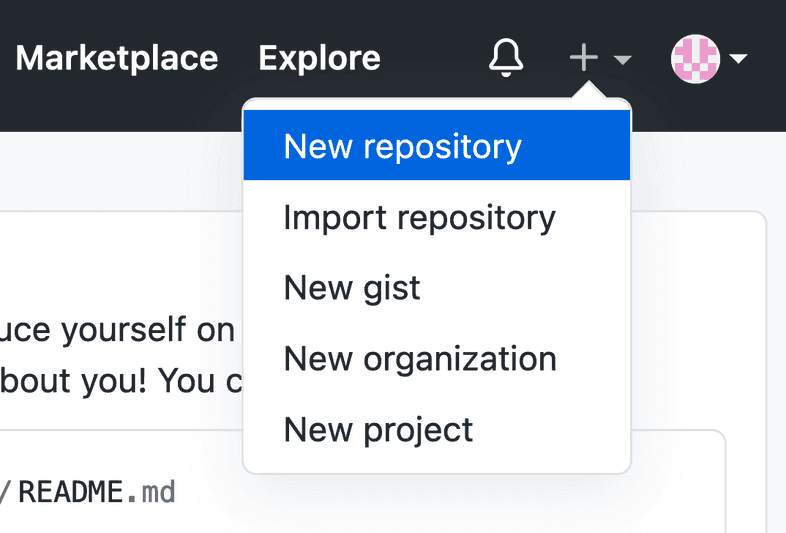
Each codebase on GitHub is stored in its own repository (also called a “repo”, for short). To create a new repository for your blog, click the plus icon in the top-right corner of the navigation bar. Select “New repository”.
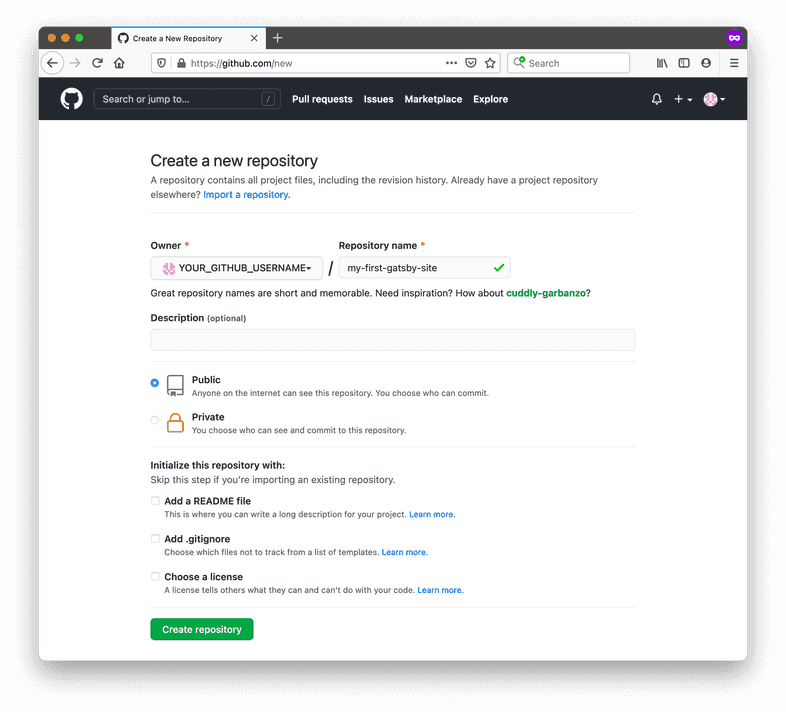
When filling out the form for your new repo, you can make it public or private. (This only affects the visibility of your code on GitHub. Your site will still be visible to everyone once you deploy it with Netlify.) Leave the initialization option checkboxes unchecked.
To push your existing code from your computer to your new GitHub repository, enter the commands below in the command line. Be sure to swap out
YOUR_GITHUB_USERNAMEfor your actual username andYOUR_GITHUB_REPO_NAMEwith the name you gave your GitHub repo (likemy-first-gatsby-site).
Using GitHub for the first time?
If you get an error about permissions when you try to push your code to GitHub for the first time, you might need to set up a personal access token for your GitHub account. This lets GitHub know that your computer has permission to push code changes to your remote repos.
For instructions on how to set up a personal access token, follow GitHub’s guide: Creating a personal access token. Your personal access token will need the repo scope to be able to push changes to your repository.
Now you have a copy of your code saved on GitHub’s servers. Next up is to deploy your site to Netlify, which you can do by following the docs here: Gatsby on Netlify.
Summary
In this section, you learned how to create a new Gatsby site and deploy it online using Netlify. As a quick review, here’s the diagram outlining the process:
Expand for detailed description
First, you write the code for your Gatsby site from your computer. When you’re ready to make your changes live on the internet, you go through the following steps:
- You push your changes from your computer to a remote repository on GitHub. GitHub is an online platform for storing code for your projects.
- Netlify watches your GitHub repository for changes. When it sees your new changes, Netlify builds your site from your code on GitHub.
- Netlify hosts the finished version of your site at a unique URL, which users can use to access the latest version of your site.
Key takeaways
- To create a new Gatsby site from the command line, you can run the
gatsby newcommand. - To run your site locally, use the
gatsby developcommand. You can view your site in a web browser atlocalhost:8000. - Netlify is an infrastructure platform that can build, deploy, and host Gatsby sites and any other framework.
- When you push a new commit to the
mainbranch of the GitHub repository for your site, Netlify will detect the changes, rebuild a new version of your site, and then redeploy it.
- When you push a new commit to the
Share Your Feedback!
Our goal is for this Tutorial to be helpful and easy to follow. We’d love to hear your feedback about what you liked or didn’t like about this part of the Tutorial.
Use the “Was this doc helpful to you?” form at the bottom of this page to let us know what worked well and what we can improve.
What’s coming next?
Now that you have a default Gatsby site up and running, it’s time to make it your own. In Part 2 of the Tutorial, you’ll learn how to use React to customize the design and contents of your site.
Continue to Part 2


