What I’m about to go over isn’t exactly news; Server-Side Rendering (SSR) was introduced with Gatsby 4 in 2021. But it’s a topic I’d like to tackle from another perspective; as a first-time user, how easy is it to get started with SSR?
Some use cases for SSR include dynamic personalization and the ability to index recent data with search engines by making sure the HTML is rendered on the server. If you’d like to know more, there’s a Guide to Rendering Options that lays out a concise summary of when and why you’d use SSR.
When I started at Gatsby, I had used it to create a static blog back in… I wanna say 2018? Long before SSR was released in 2021. I also created a few hello-world and to-do list projects in the latest Gatsby 4 while I was interviewing in Mid-2022 out of sheer curiosity. But I hadn’t used SSR yet.
Luckily, the indefatigable Paul Scanlon went on a very impromptu Twitch stream with me to walk me through it. This post is a walkthrough of my notes and the lessons learned from that experience as a new SSR user. One thing I think you’ll find interesting is how easy it is to get set up with SSR from scratch.
The Project
The project is a demo app that, at the index, renders an h1 with an image of a random cat underneath, client-side. On the /demo page, it will output similar, but with more information and with SSR. The project itself took me about 10 minutes to build, and that includes looking up APIs. On the /demo page, the project uses server-side rendering to capture more information about the cat image rendered and render html accordingly. You can find the completed project here.
Prerequisites
- Node.JS version 18 or higher (I used 18.6.0). You can download the installer from the Node.JS website. This comes bundled with the second prerequisite, npm.
- Terminal and basic terminal knowledge (navigating folders, moving/editing/deleting files, etc).
- A code editor like vim, VS Code, etc.
- (For deploy only) git and git knowledge, GitHub account
- (For deploy only) a Gatsby Cloud account
The Plan
- Setting up the Development Environment
- Create Client-Rendered Gatsby page
- Create Server-Rendered Gatsby page
- (Optional) Deploy to Gatsby Cloud
Setting up the Development Environment
Creating the Project Folder
One way to go about this is if you want to deploy to Gatsby Cloud– First, create a GitHub account if needed, or sign in. Then, create a new, empty repository (tutorial here), set up your ssh connection (tutorial here), and clone your repository, which will create a folder. In your terminal, navigate to this folder.
If you’re deploying elsewhere (or just keeping it local)– In the terminal, navigate to an appropriate folder to store code projects and create a directory (call it whatever you like). Navigate into that folder.
Initializing npm
In your terminal, in the folder you intend to work in, run:
This will answer yes to all confirmation questions and create a package.json file in your project folder.
Editing `package.json`
We need to add some script calls to the configuration object stored in `package.json`. Replace the value of `”scripts”` in the file with the following code:
Create a .gitignore file
NOTE: if you cloned your GitHub repository and you already have the Node GitHub .gitignore file in your project folder, skip to ‘Modify our .gitignore for Gatsby’
Even if you’re not deploying to Gatsby Cloud, you may be using git and GitHub to save your projects. When you do this, a good .gitignore file is essential. We’re going to borrow GitHub’s .gitignore file for Node.JS.
Run the following command in your terminal in your project folder to create a .gitignore file using GitHub’s as a template:
Modify our .gitignore for Gatsby
At around line 94 of the generated .gitignore file by my last look is a block of statements concerning Gatsby files. Uncomment the file/folder names, but not the instruction block. It should look something like this:

Installing react, react-dom, and gatsby
In your project folder run:
In the package.json, make triple-sure the Gatsby version is 4 using the `”dependencies”` property:

Create a gatsby-config.js file
In your terminal, create a gatsby-config.js file, and in your editor, add the following:
The development environment setup is now complete and we can start writing some Gatsby code!
Creating a Standard Gatsby Page
Get the Cat-as-a-Service API URL
To show a cat, we just have to point an img tag at the URL given to us by the Cat-as-a-Service API: https://cataas.com/cat.
Create an Index Page
First, in your terminal, in your project folder, create an src folder and a pages folder inside the src folder. Then, in the src/pages directory, create a file called index.js. Then, open it in your code editor, and add the following code into it:
This code creates a Gatsby page that, on the client-side, will render a heading and an image of a cat.
Running the Development Server
In your terminal, in your project folder, run the following:
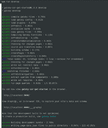
This will start the Gatsby development server– we modified it to back in Setting up the Development Environment. Shortly you should see something like the following in your terminal:

You can then go to localhost:8000 in your browser and you should see your heading and a cat picture:

Now for what we came here for– Server-Side Rendering
Creating a Server-Side Rendering Gatsby Page
The Cat-as-a-service API also has the ability to send a JSON object with information about the cat picture we will show. We will use Server-Side Rendering (SSR) to get the data, render it to html, and send it to the browser.
Getting the Cat data
We’ll be using the same URL, but sending a query parameter this time to tell it to send us JSON: /cat?json=true.
Creating A New Gatsby Page
In your src/pages folder, create a file called demo.js. Next, add the following code:
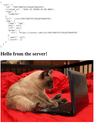
This is the basic skeleton of an SSR Gatsby page. Note the getServerData() function– this is where you do any server-side rendering and fetching of data, then return an object with the props key set to whatever data you want to send to the Page function. If you load the page by running npm run develop and going to localhost:8000/demo, You’ll see the heading ‘Hello from the Server!’, followed by an empty object:

Next we’ll add the fetching of the cat picture data. Modify src/pages/demo.js with the following:
If you check your browser, you should see data below the heading now:

Finally, we’ll edit src/pages/demo.js to use the properties of the cat photo information JSON to render the image:
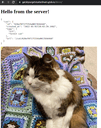
Make sure you have npm run develop running in your terminal and head to localhost:8000/demo and you should see a cat and a header again, but this time using SSR!

Now we’ll take a look at deploying this project to Gatsby Cloud!
(Optional) Deploy to Gatsby Cloud
Get code on GitHub
First, we’ll need to send our code to GitHub. First, let’s use git to add our .gitignore file:
Then, add the rest of the files:
Once that’s settled, let’s commit our code:
And push it up to GitHub:
Setup Gatsby Cloud
Once we’ve got our code on GitHub, we’ll need the Gatsby Cloud dashboard. Log in with your Gatsby Cloud account and go to the Dashboard:

Click the ‘Add a Site’ button on the upper right to get started. Once the form has loaded, use your connected GitHub account to select the organization and repo we created back at the beginning.

Select ‘import’ to continue on the repo you created. On the next page, do not change any of the basic configuration variables, and click Next.

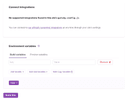
Gatsby Cloud should detect no integrations from our gatsby-config.js and it should take you to the environment variables section. Skip this and click ‘Build Site’.

You will be taken to your new site’s build page, where after a few seconds a build should appear in progress in your Build History:

Click on the Build title to be taken to the build page, which shows the logs for the build:

Wait until the build is finished, then click the link to the finished build shown in the build window (the URL ending in `gtsb.io`:

This will take you to the index page:

Then you can add /demo to the end of the URL to see your SSR page:

Hopefully this project has shown you how easy it is to start using Server-Side Rendering in your Gatsby projects. You can learn more about SSR in our documentation, and sign up for your own Gatsby Cloud account here.
